
- Home
-
-
Introduction to Reed Diffuser Filling and Capping Machine
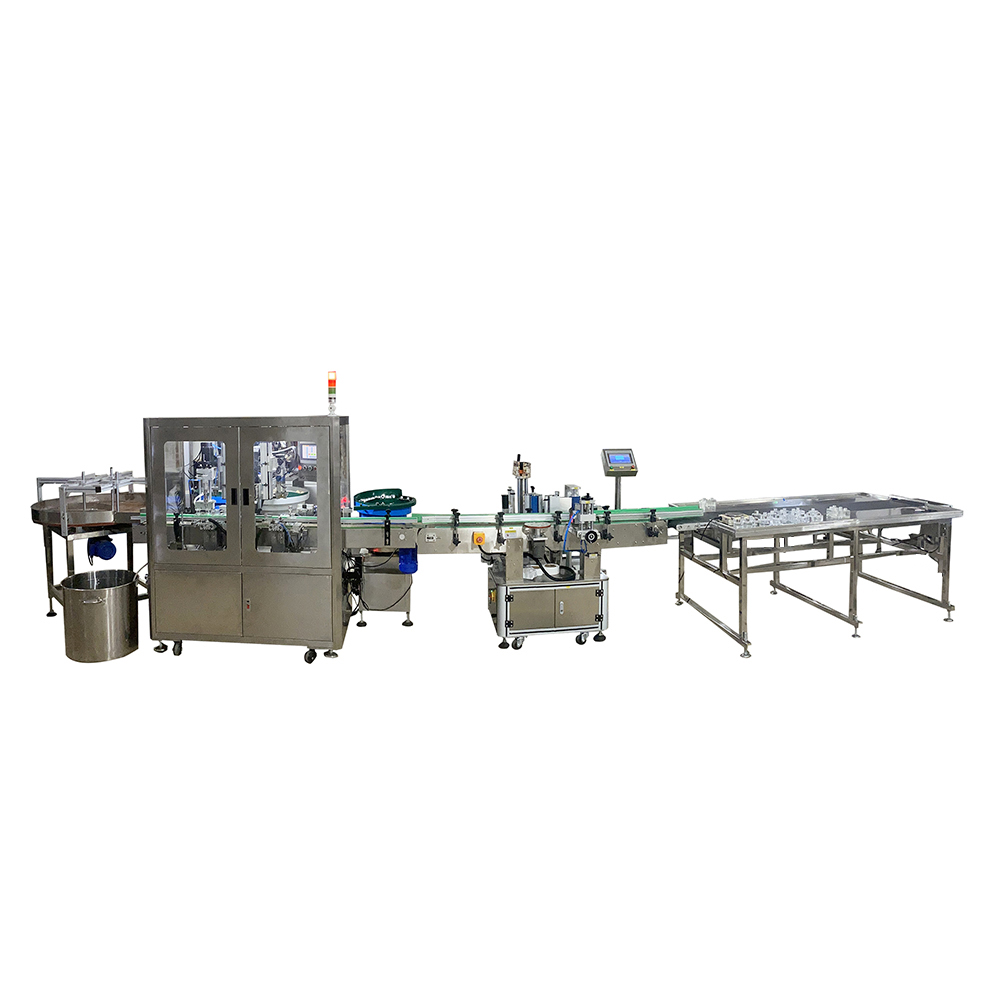
Fully auto Reed Diffuser Filling Machine is multi-function machine. It can realize the function of filling-inner lid loading-inner lid pressing-screw cap loading-screw cap capping all in one machine. Whole machine is made of stainless steel material and widely use in home fragance field. The machine is PLC touch screen controlled and easy to operate and maintenance!
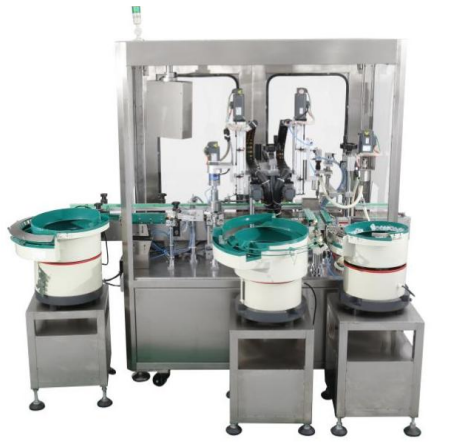
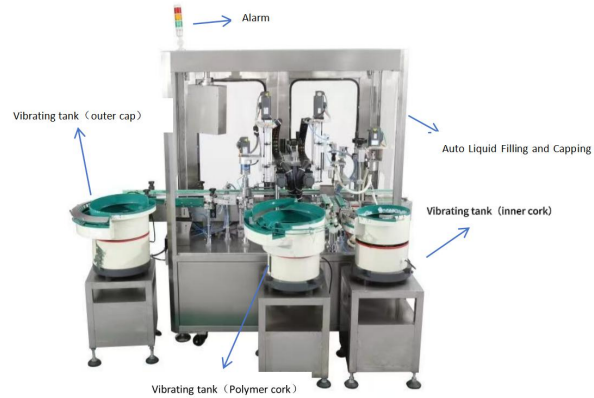
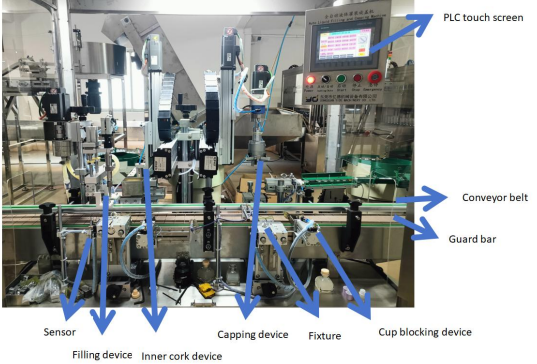
Structure
Key System Parameters
Parameter Specification
Model
YD-21
Power Supply
220V 50Hz Single Phase
Power
5KW
Filling Nozzle
Single Nozzle
Filling Pump Size
10L
Filling Range
10–1000g
Filling/Capping Speed
15–30 bottles/minute
Capping Size
Φ15–40mm
Machine Size
2.01 × 0.78 × 1.7m
Weight
685KG
How to Operate
The machine’s operation is tailored to two cup types—square cups (with polymer corks) and round cups (with inner corks + outer caps). Below is a simplified, step-by-step guide for both:
1. Pre-Operation Preparation
First, gather your materials: fragrance oil, empty cups (square or round), corresponding lids (polymer corks for square cups; inner corks + outer caps for round cups), and alcohol (for later cleaning). Ensure the machine is connected to a 220V power supply.
2. Operation for Square Cups (Polymer Corks)
1. Lid & Cup Setup: Adjust polymer corks in the vibrating tank, clear debris from the conveyor belt, then turn on the cork control power and vibrator switch. Align corks with cup mouths.
2. Cup Positioning: Adjust three cups at a time (start with the middle one), then use the guard bar to minimize gaps between cups.
3. PLC Initialization: Open the PLC touchscreen, enter the Manual Screen, select “Reset” to return the motor to its initial state, then activate the “Left Clamp Cylinder” to secure cups.
4. Parameter Setting: Go to the Parameter Screen, select “Right Feeding Motor” (for polymer corks) and turn off the screw cap function (set capping speed to 0). Dip the suction cup in water for better grip.
5. Debugging: Enter the Debugging Screen to adjust the suction cup to the center of the polymer cork (leave a 1mm gap), upload the position data, then test the suction cylinder (via the Manual Screen) to ensure it grips the cork.
6. Filling Alignment: Manually adjust the filling nozzle to align with the cup mouth—press and hold the filling position to center the cup, then lower the nozzle into the cup.
7. Test & Formal Run: Test filling in Manual Mode, then use the Revise Screen to fine-tune volume (increase if too small, decrease if too large). Finally, enter the Automatic Screen, set filling volume/speed, and press “Start.”
3. Operation for Round Cups (Inner Corks + Outer Caps)
Steps 1–6 are nearly identical to square cups, with key differences:
• Lid & Motor Selection: In the Parameter Screen, select “Left Feeding Motor” (for inner corks) and skip the water-dipping step (inner corks don’t need it). Replace the fixture with Fixture 2 (for round cups).
• Screw Cap Setup: After filling alignment, go to the Parameter Screen 2 to set capping parameters: torque (adjust based on cap tightness needs), pitch (2–3cm, reference value), and rotation speed (10 turns).
• Formal Run: Enter the Automatic Screen, activate “Reset” to reset the motor, then press “Start” to begin filling and capping.
4. Shutdown
After production, turn off the power switch. For cleaning (see next section), use alcohol to wipe down the filling nozzle and suction cups.
Attention
To ensure safe operation, avoid equipment damage, and maintain product quality, follow these critical notes:
1. Standardized Debugging: Never debug randomly—use the machine’s “Positioning Mode” to prevent collisions between components (e.g., suction cups and cups).
2. Vibrating Tank Adjustment: If the tank’s vibration is too high (corks jump), lower the controller voltage; if too low (corks move slowly), increase the voltage.
3. Motor & Screw Cap Settings:
Use the Right Feeding Motor for polymer corks (and turn off screw caps).
Use the Left Feeding Motor for inner corks (and turn on screw caps, set speed to 10 R/S as a reference).
Cup Alignment: Always use three cups for alignment—fix the middle one, adjust the rear cup to calibrate the sensor, and use the front cup to set the cup-blocking device.
Turntable Use: Turn off the turntable (set speed to 0) for square cups (place them manually); turn it on for round cups, and adjust the turntable outlet width (too narrow causes jams).
6. Cork Uniformity: Ensure inner corks have consistent specifications—size differences will make suction cups fail to grip, leading to uncapped cups.
7. Water-Dipping Rule: Only dip suction cups in water for polymer corks; skip this step for inner corks (water can affect scent or cork adhesion).
Conclusion
Reed Diffuser Filling and Capping Machine isn’t just a piece of equipment—it’s a solution to the most common pain points in diffuser production. Its all-in-one automation cuts labor time, its precise controls eliminate filling/capping errors, and its flexibility (for square/round cups) adapts to diverse product lines. Built with durable stainless steel and a user-friendly PLC system, it’s suitable for brands of all sizes looking to scale efficiently.
For home fragrance manufacturers aiming to deliver consistent, high-quality reed diffusers while keeping up with market demand, this machine is an investment that pays off—saving time, reducing waste, and ensuring every bottle meets your brand’s standards. Whether you’re producing small batches or mass quantities, it turns a complex process into a seamless, reliable workflow.


